Freestall installation looks straightforward on paper. In practice, a few millimeters in the wrong direction on a neck rail or a brisket locator placed two inches too close to the curb can trigger diagonal lying, soiled beds, and lameness across an entire pen. This guide walks through every component in sequence, with the exact dimensions that research from the University of Wisconsin Dairyland Initiative and Penn State Extension have validated on working farms.
Every installation decision downstream - bed length, curb height, brisket placement, neck rail height - is derived from the body dimensions of the animals you're housing. Installing a single stall size across a pen with wide weight variation is the leading cause of poor stall usage and diagonal lying.
The University of Wisconsin Dairyland Initiative recommends sizing stalls to accommodate the largest 25% of cows in each pen group. For standard mature Holsteins (1,300–1,500 lbs), use the reference dimensions below. For mixed-age or mixed-breed pens, size closer to the upper end of each range.
| COW BODY WEIGHT | STALL WIDTH (ON-CENTER) | BED LENGTH (SAND) | BED LENGTH (MATTRESS) | CURB TO BRISKET |
|---|---|---|---|---|
| 900–1,100 lbs | 44" | 7.5 ft | 8.0 ft | 60–64" |
| 1,100–1,300 lbs | 46" | 8.0 ft | 8.5 ft | 64–68" |
| 1,300–1,500 lbs | 48" | 8.5 ft | 9.0 ft | 68–72" |
| 1,500–1,700 lbs | 50" | 9.0 ft | 9.5 ft | 72–76" |
Tip: For head-to-head stall configurations, the minimum total platform length (curb to curb, front to front) is 16 feet, with 17 feet preferred. Platforms shorter than 16 feet force cows to lunge sideways, increasing diagonal lying and bed soiling.
Pour the Rear Curb(Foundation of every stall measurement)
The rear curb is the structural anchor for the entire stall. Every other dimension - brisket locator distance, lower divider rail height, neck rail height - is measured from the top of the rear curb. Get the curb wrong and all downstream measurements cascade into errors.
|
REAR CURB SPECIFICATIONS |
|||
| Height (sand stalls) |
8" max above alley |
Height (mattress stalls) |
7" + 2" rise to brisket |
| Curb width |
6–8" wide |
Cross slope option |
2" slope alley→bed |
Form the curb to run the full length of the stall row. The curb top should be level across its width, or may slope inward (toward the stall bed) by no more than 2 inches to assist drainage away from the bed. Higher curbs block lame cows and first-lactation heifers from exiting stalls - this is one of the most consistent design errors observed on farms.
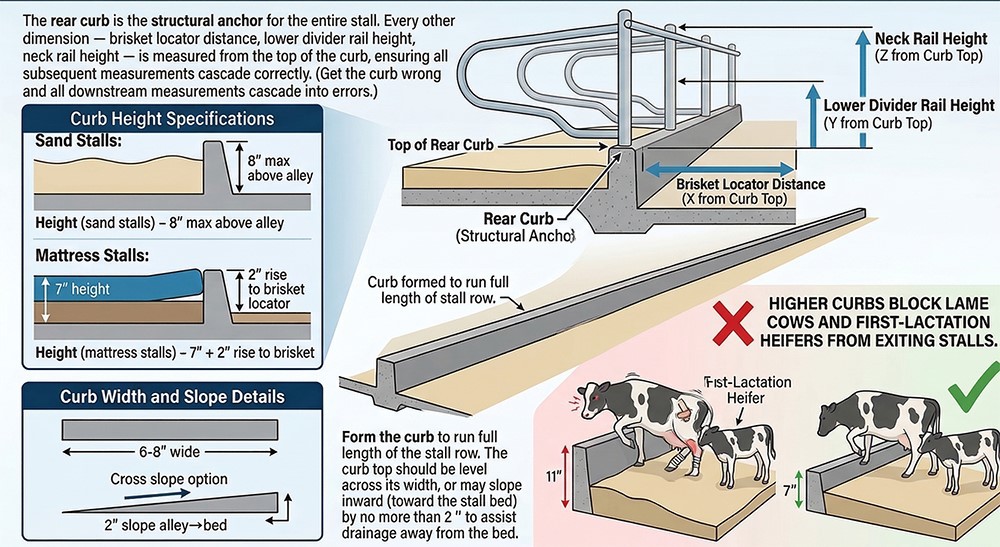
Common mistake: Builders sometimes pour curbs at 10–12 inches to "keep stalls cleaner." Research shows this height significantly increases the effort required for cows to step over the curb when exiting, leading to reduced stall use and higher standing time - the opposite of the intended effect.
Form and Pour the Stall Platform(Slope, texture, and structural prep)
The stall platform is the concrete base between the rear curb and the front wall or head-to-head divider. For deep-bedded (sand or compost) stalls, the platform is typically rough concrete - it will be covered by 6 or more inches of bedding. For mattress installations, the platform must be finished smooth enough for the mattress pad to lie flat without air pockets.
|
PLATFORM SPECIFICATIONS |
|||
| Slope (rear to front) | 1–2" upward | Platform thickness |
4" min reinforced slab |
| Finish (sand stalls) |
Rough broom finish |
Finish (mattress stalls) |
Steel trowel smooth |
The 1–2 inch upward slope from rear to front serves two functions: it encourages urine to drain toward the manure alley, and it supports the cow's natural resting preference to lie slightly head-up. Excessive slope (over 3 inches) causes discomfort and increases the rate at which cows shift resting position.
Tip for mattress installations: If using a concrete brisket slope design (the preferred modern approach), integrate the slope form into the platform pour rather than adding it as a separate step. This creates a cleaner bond and is less likely to crack or shift over time.
Mark and Set Divider Posts(Spacing, plumb, and mounting method)
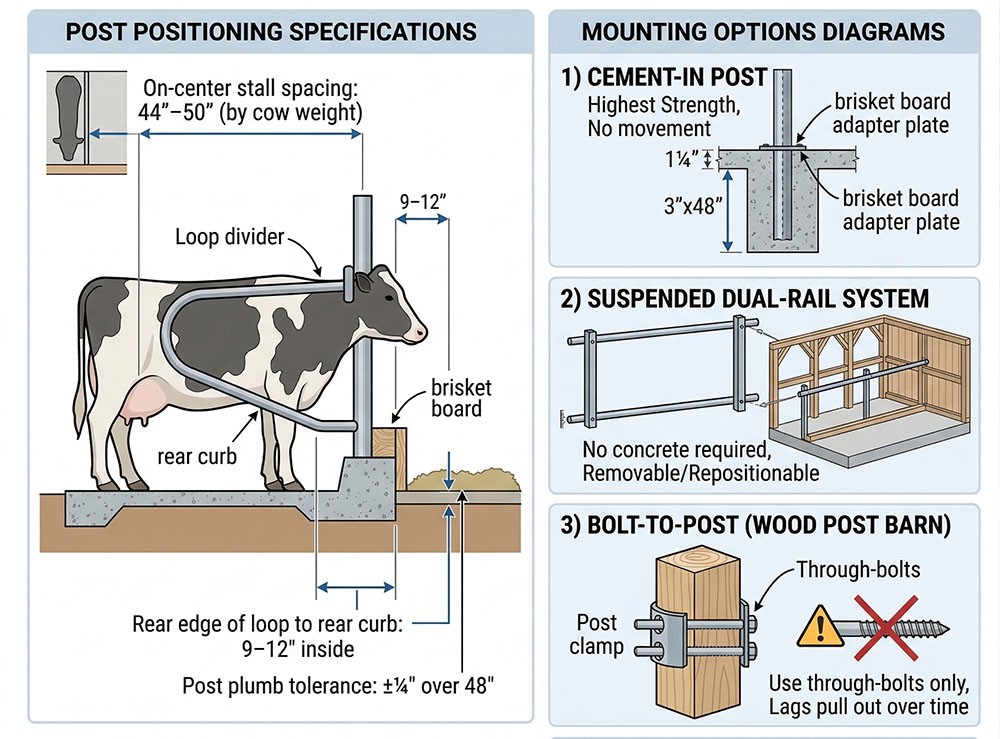
Divider posts establish the on-center spacing for each stall and carry the structural load of the loop divider. Consistent spacing across the entire row is critical - even a 2-inch error in a single bay will cause that stall to be too narrow and rarely used by cows.
Mounting Options
Cement-in post: A 3" x 48" steel post with a brisket board adapter plate is set into the concrete during the platform pour. Highest strength, no post-movement over time, but requires planning before concrete is placed.
Suspended dual-rail system: Posts attach to two horizontal steel rails that span the full row length and are anchored to the barn structure. No concrete anchoring required, and stalls can be removed or repositioned without demolition. Increasingly preferred for new builds.
Bolt-to-post (wood post barn): Use through-bolts rather than lag screws when attaching post clamps to structural wood posts. Lags pull out over time under the lateral forces of rising cows.
|
DIVIDER POST POSITIONING |
|||
| Rear edge of loop to rear curb |
9–12" inside |
On-center stall spacing |
44"–50" (by cow weight) |
| Post plumb tolerance |
±¼" over 48" |
|
|
Watch out: In barns where structural posts fall on 8-foot centers and stall spacing is 50 inches, you may end up with a barn post landing between two stall loops. Plan your stall-center layout before setting barn posts during new construction to avoid this conflict.
Install the Divider Loop(The most critical component for cow placement)
The divider loop is the heart of the freestall. Its lower rail defines the lateral limits of the resting space and either allows or prevents side lunging. Research from the Dairyland Initiative is clear on this: the lower rail is the most important part of the divider. Its angle and height determine whether cows lie straight or diagonal.
|
DIVIDER LOOP DIMENSIONS - MATURE HOLSTEIN (1,300–1,500 LBS) |
|||
| Interior loop diameter |
33–36" |
Lower rail angle point |
20–22" behind brisket |
| Upper edge of lower rail |
12" above rear curb |
Upper rail length (18-ft platform) |
88" from rear curb |
| Lower rail length (18-ft platform) |
64" |
Gap lower rail to brisket top |
5" minimum |
When installing, verify that the loop creates a 32-inch high unobstructed opening above the stall surface across the full stall width. This is the minimum clearance for a cow to lunge through during rising. Obstructions in this zone - a horizontal bar, a mounting bracket, a brisket locator set too high - are the most common causes of injury during rising.
Sand stall bedding note: For sand-bedded stalls, use 9-gauge hot-dipped galvanized (HDG) loops rather than standard galvanized. Sand is abrasive and accelerates corrosion at mounting points. Budget for loop replacement on a 10–15 year cycle even with HDG hardware.
Set the Brisket Locator(Position cows cleanly without obstructing rise)
The brisket locator guides the cow to position herself correctly in the stall so her manure drops into the alley rather than on the stall bed. Positioned too far forward (closer to the front wall), cows lie with their hindquarters over the alley and soil the stall rear. Positioned too close to the curb, cows lie diagonally.
|
BRISKET LOCATOR SPECIFICATIONS |
|||
| Distance from rear curb (Holstein) |
68–72" |
Maximum height above stall surface |
4" (10 cm) |
| Gap to lower divider rail |
5" minimum |
||
Brisket Locator Options
Concrete brisket slope (preferred for sand stalls): A gentle concrete slope that rises to 3.5 inches above the rear curb at the locator position. Integrated during the platform pour. Allows the cow to plant her front leg against the slope when rising, pushing herself backward - the safest and most effective design.
HDPE poly tube (4–6" diameter): Mounted to the lower divider rail or anchored to the concrete. Durable and cow-safe, but must be adjustable to set the correct height. Common in retrofit situations.
Wooden 2×10 board: Traditional option, still acceptable if correctly positioned. Requires replacement every 3–5 years due to urine damage and cracking.
Most common installation error: Brisket locators mounted too high. When attached to the lower divider rail at a fixed bracket, the locator often ends up 6–8 inches above the stall surface - far above the 4-inch maximum. A locator this high will cause cows to lie with one front leg thrown over it, increasing hock injuries and reducing stall comfort.
Install the Neck Rail(Determines standing position - not resting position)
A misunderstood but frequently misinstalled component: the neck rail does not position the cow while she is lying - the brisket locator and divider loop do that. The neck rail positions the cow when she is standing in the stall, and it must be high enough to allow her to rise beneath it without hitting the underside.
|
NECK RAIL POSITIONING |
|||
| Longitudinal position |
Above or 1" behind brisket |
Height (mature Holstein) |
47–49" above stall surface |
| Minimum clearance to rise |
Cow rises without contact |
||
To verify correct height after installation: stand at the rear of the stall and observe a cow as she rises. She should complete the full rise motion without her neck or withers contacting the underside of the rail. If the cow hesitates, ducks sideways, or steps to the side rather than stepping forward, the neck rail is too low or too far forward.
Adjustability matters: Use a swaged-end neck rail system with U-bolt cross clamps rather than fixed-weld mounting. This allows the rail to be raised or lowered by 2–4 inches during the observation period after cows are introduced - almost always necessary on first installation.
Add Bedding and Observe(The installation isn't complete until cows confirm it)
Bedding is not an afterthought - the type and depth of bedding material changes the effective height of every component above it. Filling a sand stall 6 inches deep raises the effective stall surface by 6 inches relative to the curb, which changes the functional height of the brisket locator, the clearance of the divider lower rail, and the height of the neck rail above the cow.
Sand: Fill to a minimum depth of 6 inches (150 mm). Sand should be packed 3 inches below the top of the rear curb before filling so the final surface is level with or slightly above the curb lip. Top with fresh sand after every scraping cycle to maintain depth.
Mattress pad: Lay the mattress with the upper edge 1–2 inches below the inside corner of the rear curb. The mattress must lie flat without humps or air pockets. Top-dress with 1–2 inches of dry organic material (chopped straw, dry sawdust, or lime).
Recycled manure solids (RMS): Must be dried to below 30% moisture before use. Apply 4–6 inches and repack after each scraping. RMS has higher bacterial counts than sand; stall hygiene and grooming frequency become more critical.
After introducing cows to a new or retrofitted stall row, observe for 48–72 hours before deciding adjustments are needed. Watch for:
Cows lying diagonally → brisket locator too close to curb, or lower divider rail too restrictive
Cows perching (2 feet in, 2 feet out) → neck rail too low or brisket locator too far forward
Cows refusing stalls → check for physical obstructions in the lunge zone or a curb that is too high
Soiled stall beds → brisket locator too far from curb, or stall too long
Common Freestall Installation Mistakes
Most freestall problems trace back to a handful of installation errors that appear minor on the blueprint but produce large welfare and productivity consequences at scale.
✗ WRONG
Curb poured at 10–12" to "keep stalls cleaner" - lame cows and heifers cannot exit, stall use drops.
✓ RIGHT
Curb at 8" maximum. Stall cleanliness is controlled by brisket position and neck rail, not curb height.
✗ WRONG
Brisket locator attached to divider rail at factory height, ending up 6–8" above surface.
✓ RIGHT
Brisket locator independently adjustable. Final height verified after bedding is placed - 4" max.
✗ WRONG
Neck rail set low ("to keep cows from going too far forward") - blocks rising and causes neck injury.
✓ RIGHT
Neck rail at 47–49". Position, not height, controls standing spot - use brisket for that function.
✗ WRONG
Head-to-head platform at 14–15 feet, forcing side lunging and diagonal lying in front stalls.
✓ RIGHT
Head-to-head platform at 16 ft minimum, 17 ft preferred. Enough space for full forward lunge.
Pre-Opening Installation Checklist
Run through this list on every stall row before introducing cows. Print it out and check physically, not from memory.
Rear curb height verified at ≤ 8" above alley (sand stalls) or ≤ 7" (mattress stalls)
Stall platform slope confirmed at 1–2" rise from rear to front
Divider post spacing consistent across all bays (verify every 5th bay with tape)
Loop lower rail upper edge is exactly 12" above rear curb point at every stall
Lower divider rail angle confirmed at 20–22" behind brisket locator position
Loop interior diameter between 33–36" at all stalls
32" unobstructed lunge zone above stall surface at front of every stall
Brisket locator positioned 68–72" from rear curb (mature Holstein)
Brisket locator height ≤ 4" above stall surface after bedding is placed
5" minimum gap between brisket top and lower divider rail underside
Neck rail longitudinally above or 1" behind brisket locator
Neck rail height 47–49" above stall surface (swaged/adjustable mount)
Sand filled to min 6" depth or mattress laid flat with no air pockets
All hardware torqued to spec; no sharp edges or weld burrs in cow contact zones
Observer assigned to monitor for 72 hours after cow introduction
FAQ
01.What is the correct neck rail height for a freestall?
For mature Holstein cows (1,300–1,500 lbs), the neck rail should sit 47–49 inches above the stall surface, positioned directly above or 1 inch behind the brisket locator. The key test is that the largest cow in the group can stand with her back level and neck gently contacting the rail.
02.How far should the brisket locator be from the rear curb?
For mature Holsteins, 68–72 inches from the rear point of the curb. The locator must sit no higher than 4 inches above the finished stall surface (after bedding) so cows can pass their front leg over it when rising.
03.How high should the rear curb be?
The maximum recommended rear curb height is 8 inches above the alley for sand-bedded stalls. For mattress stalls, 7 inches with a 2-inch rise toward the brisket position. Higher curbs reduce stall accessibility, particularly for lame cows and first-lactation heifers.
04.What is the minimum freestall width for Holstein dairy cows?
48 inches on-center for mature Holsteins in the 1,300–1,500 lb range. This measurement is taken between divider loop centers, not between the physical steel of adjacent loops. Narrower stalls (44–46") are appropriate for lighter heifers and smaller breeds.
05.How deep should sand bedding be in a freestall?
A minimum of 6 inches (150 mm) of sand depth is required on the stall surface. Sand should be filled to sit level with or slightly above the inside lip of the rear curb. As sand settles and is removed through scraping cycles, it must be replenished frequently - daily on high-use stalls in summer - to maintain depth.
06.Can I retrofit freestalls into an existing tie-stall barn?
Yes, though the retrofit complexity depends on the existing barn width and stall orientation. Suspended dual-rail systems are the most practical choice for retrofits because they require no concrete anchoring for the posts. The primary constraint is usually alley width - the converted manure alleys must be wide enough for cows to pass each other comfortably (minimum 10 feet for a walking alley, 12 feet for a feed alley).