Portable livestock panels are one of the most flexible tools on any ranch or farm. Whether you are building a temporary corral, a sorting pen, or a secure holding area for the night, knowing how to connect panels correctly makes the difference between a safe enclosure and a costly escape. This guide walks you through every step.
16 ft
STANDARD PANEL LENGTH
50 lbs
AVERAGE PANEL WEIGHT
2 min
PER CONNECTION WITH SNAP PINS
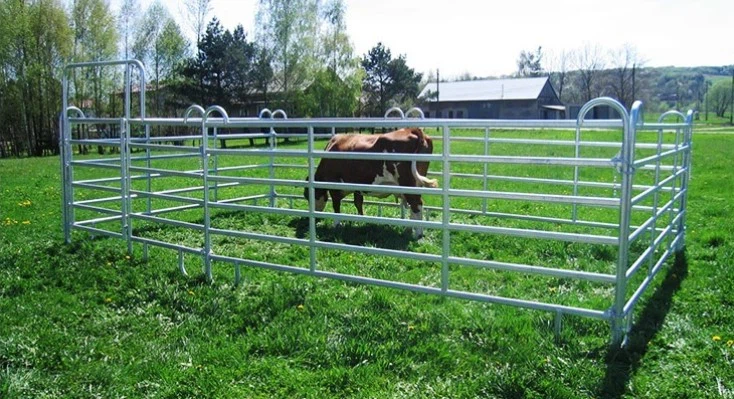
Understanding portable livestock panel types
Before connecting any panels, it is important to choose the right type for the animals you are managing. Using panels with the wrong spacing or gauge can result in injury to small animals or structural failure under pressure from larger ones.
Cattle panels
Heavy gauge wire, 16 ft standard length, wide vertical spacing. Ideal for beef cattle, horses, and large livestock.
Hog panels
Graduated spacing, narrower at the base. Designed to contain pigs and prevent small animals from slipping through.
Sheep & goat panels
Shorter height, tighter weave at lower sections. Prevents young animals from escaping through the lower openings.
Horse panels
Taller profile (up to 6 ft), smooth horizontal rails, no sharp protrusions. Minimizes hoof and leg entanglement risk.
Tools and connectors you will need
Having the right connectors before you start saves time and ensures each joint can handle real animal pressure. Below is a comparison of the most common connection methods used on working ranches.
|
CONNECTOR TYPE |
BEST FOR | SPEED | SECURITY | COST |
|---|---|---|---|---|
| J-clips (locking pins) | All livestock, permanent setups | Moderate | High | Low |
| Snap hooks / carabiners | Temporary corrals, fast moves | Fast | Moderate | Low |
| Bolt snaps | Gates, single-point connections | Fast | Moderate | Low |
| Wire ties / hog rings | Long-term fixed setups | Slow | High | Very low |
| Panel clamps (U-bolts) | Posts, corner anchoring | Moderate | Very high | Medium |
Step-by-step: how to connect portable livestock panels
Plan your layout before you unload panels
Walk the area and sketch a rough layout showing the shape, dimensions, and gate position. For cattle and horses, a minimum pen size of 400 square feet per animal is recommended for short-term holding. Mark your four corners with stakes or flags before touching a single panel. This step prevents the most common mistake on ranch setups: running out of panels or placing the gate in a location that blocks vehicle or equipment access.
PRO TIP
Orient your gate opening downwind and away from the direction the animals will be approaching from. This reduces the chance of a stampede toward the exit during setup.
Gather all tools and connectors before starting
Lay out your panels, connectors, T-posts, post driver, and any panel clamps before you begin assembling. Running back to the truck mid-setup often means leaving unsecured panels that can shift or tip when bumped by curious animals. A basic connection kit for a 10-panel corral should include at least 20 J-clips or snap hooks, 4 T-posts, 4 panel clamps, and 1 gate set.
Drive corner and anchor posts first
At each corner of your layout, drive a T-post or stake at least 18 inches into the ground. Corners experience the most lateral force when animals push against the fence line, so a solid anchor here prevents the entire structure from collapsing. For soft or sandy ground, drive posts 24 to 30 inches deep, or use ground anchor plates designed specifically for portable panel setups.
PRO TIP
For large enclosures over 60 feet per side, add a mid-run T-post on each panel run to prevent the fence line from bowing outward under animal pressure.
Connect panels at each joint using two connectors
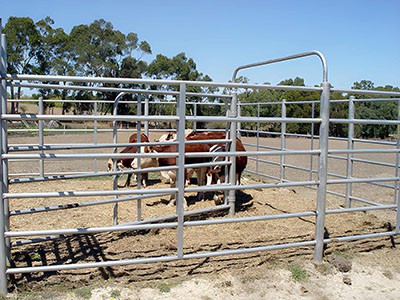
Overlap the vertical end rails of two adjacent panels by one wire width, then attach one connector near the top and one near the bottom of the joint. Using two connection points per joint is the single most important rule for panel security. A single top connection allows the bottom of the panel to swing outward, creating a gap wide enough for cattle calves or adult pigs to push through. Thread each J-clip through the overlapping vertical rails, then rotate to lock it in position.
KEY RULE
Always use a minimum of two connectors per joint, placed at the top and bottom third of the panel height. One connector is a starting point, not a finished connection.
Attach panels to corner posts with panel clamps or wire
Once your corner posts are set, secure the end panel to each post using panel clamps (U-bolts) or heavy-gauge wire ties. Clamps provide the strongest and most reusable connection. Position one clamp at the top horizontal rail and one at the bottom, tightening each bolt firmly with a wrench. This anchors the entire panel run against pulling or rotation forces when large animals lean against the perimeter.
Hang and secure the gate panel
A gate panel requires a dedicated post on each side for secure hanging. Attach heavy-duty hinges to the post and the vertical rail of the gate panel, positioning the bottom hinge lower and the top hinge higher for maximum stability. Use a twist-latch or drop-bar latch on the closing side rather than a simple snap hook - animals quickly learn to push against a snap-hook gate until it yields. For added security with horses or determined cattle, add a secondary safety chain across the top of the gate.
SAFETY
Hang the gate so it swings into the pen rather than outward. Outward-swinging gates can be pushed open by an animal pressing against them.
Inspect every connection and test under load
Walk the full perimeter and physically push against each panel joint, corner, and gate before introducing any animals. Apply steady lateral pressure at the midpoint of each panel to simulate a 1,200-pound animal leaning against the fence. Check that no connector has been missed, no panel is resting on uneven ground with a gap beneath it, and the gate latch engages fully. Addressing a weak joint before loading animals takes 30 seconds; fixing a breach after an escape can take hours.
Common connection mistakes to avoid
Using only one connector per joint. The bottom of the panel can swing outward under pressure, creating a gap large enough for animals to escape through.
Skipping corner posts entirely. Panels alone cannot bear the lateral force at corners when animals push outward. Always anchor corners with a driven post.
Setting panels on uneven or sloped ground without checking for ground-level gaps. A gap as small as 8 inches at the base is enough for a calf or sheep to crawl through.
Using lightweight snap hooks on gate panels. Gate connections experience the most repeated stress. Use bolt snaps rated for at least 800 lbs, or install a proper gate latch.
Mixing panel heights in the same run without transitioning properly. Height differences at joints create gaps that curious animals will exploit immediately.
Overcrowding the enclosure. Even a perfectly constructed panel setup will fail if there are too many animals pressing against the perimeter simultaneously.
FAQ
What is the best way to connect portable livestock panels?
The most secure method is using two J-clips or locking snap pins per joint, placed at the top and bottom of the overlapping vertical end rails. Carabiner-style snap hooks provide the fastest connection for temporary setups but should be backed up with a second hook on any gate or high-pressure section.
Do I need T-posts for portable livestock panels?
T-posts are strongly recommended at every corner and at each side of a gate opening. For straight runs under 40 feet, panels often hold without mid-run posts, but adding one post at the midpoint of any run exposed to consistent animal pressure significantly reduces flex and failure risk.
How many panels do I need for a portable corral?
A basic holding corral for one or two horses or cattle typically requires 8 to 12 standard 16-foot panels, giving you a usable enclosure of 40 to 50 feet in diameter. For sorting pens, loading alleys, or temporary overnight holds for a small group, 4 to 6 panels are usually adequate.
Can livestock panels be used for pigs and sheep?
Standard cattle panels have wide enough horizontal spacing for small pigs and young lambs to pass through freely. For these animals, use hog or sheep panels with tighter wire spacing at the base. Alternatively, attach a 24-inch strip of woven wire fencing along the lower section of standard cattle panels using hog rings to close the gap.